- Messages
- 218
- Reaction score
- 0
- Points
- 26
Hi, I've realize there's already quite a number of members here who discovered and able to install macintosh on
their non-macintosh machine. I wanted to start writing this not a tutorial but as Q&A when i was still learning my
way to hackintosh but when i posted a question here about it, I didn't get any response!

I know there's already some thread existing but I still decided to create a new one for I wanted to elaborate quite
a bit on installing hackintosh on our system and hopefully would be understandable enough for everyone. If a
moderator find this redundant, you can merge it or delete and it would just be fine.
Hackintosh a name adopted for non-macintosh computer running on a complete macintosh operating system.
It's done by modifying the legit release of osx version so that it would be bottable on any computer.
WHAT YOU NEED
- a perfectly working computer of course with atleast dual core processors
(intel is the most recommended but amd and atom would still work)
LIST OF SUPPORTED PROCESSOR- INTEL : Dual & Quad Core Series, i3, i5, i7, Atom
- AMD : Phenom, Atlon, FX series
- a sata hard drive ( should be set in bios from IDE to AHCI )
for complete recommended parts specially for hobbyist who want to assemble from scratch from HERE
- an osx dvd ( this time we would just use distro release.
Note that there are at least 4 more other highly recommended way of installing hackintosh but requires
purchasing a legit copy of mac osx from appstore which most of us would not usually want to go through specially
for first timer.
DISTRO means a modified copy of the original osx version (e.g. Snow Leopard, Lion, Mountain Lion) so that
it would be readily bootable without the need of going through every steps as it was first done on the early days of
hackintosh. This includes but not limited to the release of iAtkos, Blangsak, iNDO, Hazzard and all others. Also note
that there are some rumors/issues with distro and is block from tonymac support for some of them are found embedded
with backdoor trojans.
PRE-INSTALLATION
Download the neccesary files below :
Mac OSX Distro :
Niresh
10.7 - Lion
10.8 - Mountain Lion (Latest)
iAtkos
10.7 - Lion
10.8 - Mountain Lion (Latest)
You could also search the other in your favorite torrent sites or maybe I'll add some soon.
Multibeast - best and easy post-installation tool for fixing some issues like audio, display, ethernet, wifi and other.
[
10.7 - URL="http://www.mediafire.com/?2x6avu060cjf11t"] Lion (pass:jhusly)[/URL]
10.8 - Mountain Lion
10.7 - URL="http://www.mediafire.com/?2x6avu060cjf11t"] Lion (pass:jhusly)[/URL]
10.8 - Mountain Lion
For the start of the post i would use one of the distro has the most success based on my experience and of lesser
kernel panic (equivalent to BSOD in windows). Also i recommend it since i can say that it is clean
and I was able to help him a bit to admin his page on my spare time when he releases his latest distro.
CREATING DVD INSTALLER
Niresh Lion - right-click the .iso file and burn it as image ( if you are using windows 7 or 8), you can also use third-party software to do the job like nero. Be sure to remember to burn the file at the lowest speed to ensure that data is copied correctly.
iAtkos - Download transmac and then use it to burn the file correctly in a Dual-Layer DVD. Kung may access kayo sa mac computer, mount nyu lang yung DMG file then right and burn to DVD.
iAtkos - Download transmac and then use it to burn the file correctly in a Dual-Layer DVD. Kung may access kayo sa mac computer, mount nyu lang yung DMG file then right and burn to DVD.
CREATING BOOTABLE USB another option to create an installer for osx is to use the usb method if supported by the distro maker.
Go to your motherboard's manufacturer's site and be sure to gather the following details :
I would base my example on my system which is :
AMD FX-6100 / Asrock 970 Extreme 3 (installation would just be the same except for few things)
Audio Codec : Realtek ALC892
Lan : Realtek RTL8111E
Graphics Card
Wifi Card (if you have)
HARD DRIVE PARTITION AND BIOS SETTINGS
Create a partition where you want to install the mac osx. If you have a dedicated hard drive for it, then it's better
so you wont mess up your personal files in case you did something wrong. Also rename your partitions to something
that would make sense so you would be able to identify them easily while on osx installation (e.g. C: Windows D: Mac OSX).
Qouted from lifehacker.
Disable Quick Boot. You may have to look around for this, but we've often found this in a section titled Advanced BIOS Settings. Just look for a Quick Boot or Fast Boot option and ensure it is set to disabled.
Configure SATA as AHCI. By default, your motherboard will configure SATA as IDE and you'll need to change this to AHCI. In some cases you'll be asked if you want to do this when you boot up for the first time. If so, choose yes. If not, go into your BIOS and look for this setting as you'll need to make the change for everything to work smoothly.
Change the Boot Device Order. Your BIOS will default to a specific boot order, which means it'll look for a startup volume (where the operating system lives) in various places until it finds one. The boot order is the order in which it checks each location. In general, you want to set your optical drive to first boot device so you can easily boot to a disc by simply putting it in the drive and turning on your machine. The second item in the order should be the hard drive or SSD where you're going to install OS X. The order beyond that isn't terribly important and entirely up to you.
Adjust the Hard Disk Boot Priority. Some BIOS settings pages will also have a setting called Hard Disk Boot Priority, which is used to identify which hard drive to try and boot from first if there are multiple drives in the machine. If you install more than one drive in your hackintosh, be sure to set the Hard Disk Boot Priority to the drive where OS X will be installed.
INSTALLATION
1) Load your mac osx dvd in your dvd-rom and boot from it.
2) Once the darwin boot loader is loaded, press F8 key on your keyboard. Will bring you to drive boot selection.
3) Select where your dvd is and type necessary kernel flags (refer below) before hitting enter.
Niresh bootflags :
If you are using an intel processor (excluding atom), you only have to type "-v"
If you are using an atom processor, type "Kernel Cache"=\atom -v" without the quote
For AMD processors like me, type "Kernel Cache"=\amd arch=i386 –v busratio=your busratio here DSDT=0 DropSSDT=Yes"
Finding the correct busratio for amd user, here (
Common bootflags and usage (http://www.macbreaker.com/2012/01/list-of-common-hackintosh-boot-flags_29.html)
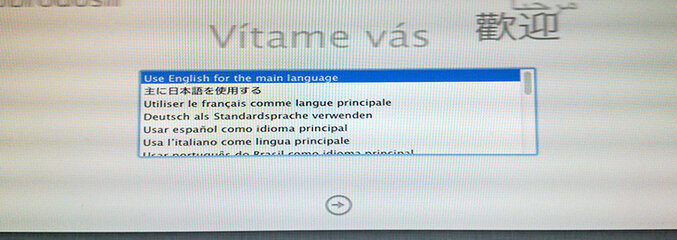
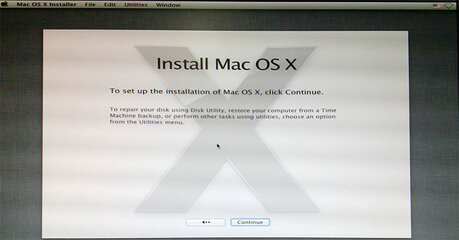
With the "-v" flag on, you would see you screen flooded with scrolling commands line executed. If you are on track, you would then see a Language Selection for mac installation
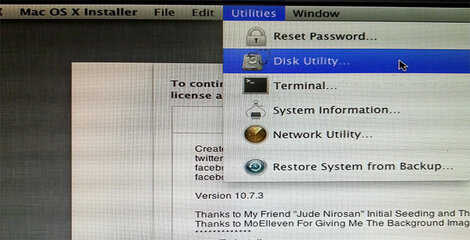
4) On the top, click Utilities > Disk Utilities
Select the HD partition where you want to install your osx
-----------------------------------------------------------------------------------------------------------------------------
DO THIS ONLY WHEN YOU WANT TO CHANGE YOU BOOT SCHEME FROM MBR TO GUID FOR 10.8 INSTALLATION

Note : This will reformat your whole drive.
After completing the instruction above, you can now create your partition by clicking plus "+" sign or the dropdown
below Partition Layout.
-----------------------------------------------------------------------------------------------------------------------------
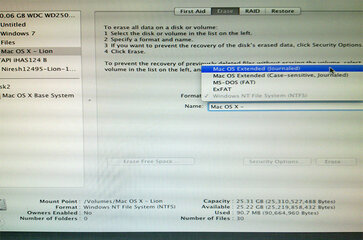
5) Open "Erase" tab, under "Format", Select "Mac OS Extended (Journaled). It usually looks like an inactive drop down but its clickable. Now hit "Erase".
Warning : this will reformat the selected partition. Always double check so you won't end up reformatting the wrong drive. And then close the window when formatting is done.
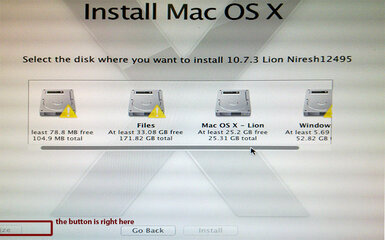
6) The installation window will goes back and then click continue and then select the drive/partition you just formatted. Before hitting install, be sure to customize your installations by hitting "Customize" button at the lower left.
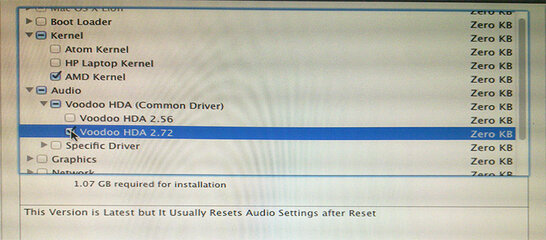
Be sure to check the appropriate kernel for your system else your installation won't boot. Intel users need not to worry this since it is using by default the intel compatible kernel. With your system specifications gathered while ago, use it to select the matching KEXT under Audio, Network. You can opt to leave the "Graphics" option uncheck to avoid kernel panic issues unless your graphics card is listed. For Audio, sometimes even using the corresponding codec listed, you still end up with no sounds. Much of the time, people just opt to install the Universal Audio from VoodooHDA 2.7. Be sure to always select only one for each on every option to avoid conflict that would result to kernel panic. Customizing the installation is quite tricky for beginners and end up the selection a reason for failed installation.
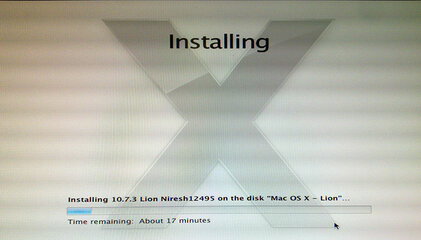
7) You can leave the rest by default and hit "install". This would usually take at least 18mins. With my experience with installation, sometimes it is advisable to move your cursor occasionally specially during the last 5 minutes of installation to avoid the system from freezing. When the cursor disappear, just don't wait no more longer that 5mins and restart the procedure if still seems freezing because it might actually is.
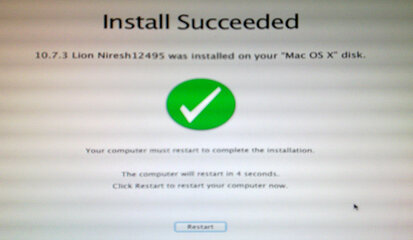
8) When installation is done and complete, you would be greeted with a success message else you have to start over again. The system would then restart itself and remove the dvd.
9)If everything went well, you would be greeted with chameleon bootloader with Niresh custom background in it. Choose your hard drive where you install the osx. Before hitting the return key, type the boot flag you use before during the installation if there is any and then add "-x" on the end. This will force the system in safe mode and load minimal kext to avoid kernel panic. Wait a little while since booting for the first time is quite longer. You would then be greeted with Customization option for you mac which requires some field to be filled. Once everything is done and landing to your mac desktop, restart you mac and then boot again with the previous boot flags except that this time you would replace the additional "-x" with "-f".
Note : if you encounter boot0:error or the like, just insert the dvd installation disk and boot from it while selecting the disk where you have installed you mac osx.
10) Check if the following is working for you to enjoy your mackintosh :
Audio
Lan
Graphics
USB
If one of them failed to work, run mutibeast application to fix the problem. Note : if you are not certain what to install, be sure to remember the location where the KEXT would be installed (it could be seen on the description panel when a certain KEXT is clicked.) It's also a good practice to clone you mac partition once you already have a running installation. Install KEXT from multibleast 1-by-1 so you would know which one works and which one causes kernel panic because this is something unavoidable while learning hackintosh way-around.
For KEXT/FIX download, you can always go to KEXT.COM
FIXING BOOT0:ERROR
Before you start worrying about fixing the boot0:error, you should make sure that the basic functionality of your hackintosh is already working - USB, Audio, Ethernet. If any of them still not working, maybe you should still run multibeast first and fix them one-by-one. Else, we'll proceed.
boot0:error is cause by certain drives with firmwares preventing chameleon/chimera to write into the boot sector, so what we need to do is install the latest version or install it manually while the device is unmounted.
First solution is just to install the latest chameleon bootloader (pass:jhusly)
- just extract the zip file and then double click the .pkg file to install. Boot error should be fixed, if not proceed to the next option.
If above don't work for you, download this (pass:jhusly) and extract it to your desktop.
1) Open the terminal (equivalent of cmd in win) and execute the following command line-by-line.
2) Type "diskutil list"
Now, take note for the partition identifier kung saan naka-install ang mac mo. Mine is "disk0s1"

3) Type "cd" without the qoute, and then drag the bootfix folder into the Terminal and hit enter. Or could also be done by typing "cd /Users/YOURUSERNAMEHERE/Desktop/bootfix"
4) Type "ls" and hit enter. Seeing "boot, boot0, boot0md, boot1h" confirm that you are inside the bootfix folder.
5) Type sudo dd if=boot1h of=/dev/rdisk0s1 - just type in your password when ask.
Replace the disk0s1 kung anu yung sau as per step-2. Wait until the command is completed and then reboot.
1) Use the dvd disk to boot into osx installation. Open "Disk Utility", select the partition where you installed the osx and hit unmount. We need to do this to stop the disk' firmware working that keep blocking the processes above.

Now execute the steps 3 to 5 in the above procedure. This is assuming that "bootfix" folder is still on your desktop.
NEXT
Detailed explaination when using multibeast to fix errors
Fixing appstore, Facetime, iCloud
Legit installation using Unibeast, MyHack, Kakewalk (hopefully)

FOR COMPATIBILITY INQUIRIES, PLEASE FOLLOW THIS FORMAT :
PC :
CPU : exact model/variant (ex. i5-2500K)
MOBO : complete model (ex. Gigabyte GA-H61M-DS2 rev2.0 socket 1155)
GPU : exact model & maker (ex. XFX HD5770)
LAPTOP :
MODEL : Complete name and model (ex. HP ProBook 4540s)
CPU : Intel Core i3 3110M
GPU : HD Graphics 3000
ADDL : manufacturer's link if available
OR SCREENSHOT OF DXDIAG (1 & 2) / CPU-Z AND GPU-Z
Here's my FX-6100 hackintosh anyway


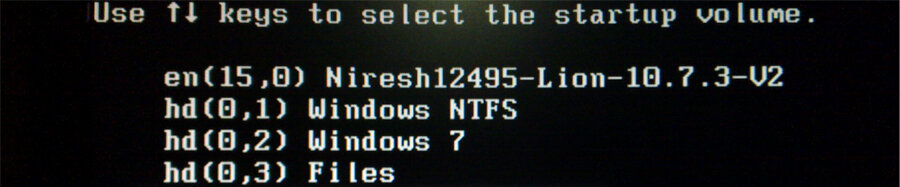
WANT TO BOOT DUAL/TRIPLE/QUAD AND SO ON...? NO PROBLEM!

This is how the bootscreen looks like!
Common Boot Flags and their usage HERE
FOR HARDWARE COMPATIBILITIES CHECK THIS PAGE.
ALSO CHECK THIS FOR SUPPORTED GRAPHICS CARD.
Attachments
-
 LOGO-FINAL.jpg151.8 KB · Views: 43,458
 -
 3-language_selection.jpg293.2 KB · Views: 43,532
 -
 4 - DiskUtility.jpg277.6 KB · Views: 43,403
 -
 5 - Erase.jpg497.3 KB · Views: 43,667
 -
 6 - Installation.jpg329.9 KB · Views: 38
 -
 8 - Customizations.jpg378.4 KB · Views: 41,650
 -
 7 - Customize2.jpg456.3 KB · Views: 43,110
 -
 9 - installing.jpg511.7 KB · Views: 41,115
 -
 10 - success.jpg332.6 KB · Views: 40,290
 -
 1 - boot_selection2.jpg152.2 KB · Views: 35,027
Last edited:


")

") Nice machine by the way and maybe you wanna try editing smbios plist so it display as Macbok, but that purely just about the looks.
Nice machine by the way and maybe you wanna try editing smbios plist so it display as Macbok, but that purely just about the looks.